Adventure School participates in the Amazon Services LLC Associates Program, an affiliate advertising program for sites to earn advertising fees by advertising and linking to amazon.com
Learn how to belay top rope climbers at the gym and outdoors in our beginner’s guide to belaying.
Most people don’t think of rock climbing as a team sport, but it most definitely is. Unless you’re a free solo master like Alex Honnold, you’ll need a partner to climb with – one to belay while the other climbs.
Belaying is fundamental to safe climbing. Every climber needs a good belayer to keep them from falling to the ground. A good belayer is one who knows what to do, is attentive, and who you’d trust your life to – because that’s exactly what you’re doing every time you go up a route.
Whether you’re needing to learn the basics to pass a gym belaying exam or looking to improve your knowledge and skill as you begin belaying outdoors, this article will break down belaying in-depth and provide you with all you need to know to be a reliable belayer.

Basics of Belaying
Here’s what I’ll cover in this article on belaying.
- Gear for belaying
- Setting up to belay
- Communication while belaying
- Belaying technique
- Catching a fall
- Lowering a climber
- Conclusion
To belay means to secure or back up the rope being used by a climber or rappeller. Belaying is just the act of keeping the climber from falling by controlling the movement of the rope. Belaying in rock climbing is accomplished by means of friction. We’ll dig into that much deeper, but first off, let’s learn about the gear you’ll need to
(Read: Learn how to rappel safely)
Gear for Belaying
Understanding the gear needed to belay is critical to providing safe belaying for your climbing partner. The minimum equipment you’ll need is a harness, a rope, a belay device, and a carabiner.
Here’s the equipment I use for gym or toprope climbing and recommend to anyone looking to get into the sport. Click the links to get prices.
Belay Devices
Belay devices come in many forms, but we’ll focus on two of the most widely used types –
- Tubular belay devices
- Assisted braking devices (ABD)
These are both very different in use, but both rely on friction and proper operation to lock down on the rope and catch or hold the climber.
Let’s look first at the tubular belay device.
Tubular Belay Device
Tubular devices most often have two slots to push a bight of rope through and a retainer wire to keep the device connected to a locking carabiner on your belay loop or directly to the anchor. The simple design of these belay devices means they’re relatively lightweight and will last a long since they have no moving parts.
The various brands and models provide additional features such as added friction and extra loops to set up a belay in guide mode. The most common model is the Black Diamond ATC – ATC stands for Air Traffic Controller.
When to use: Tubular belay devices are most appropriate for use in gym climbing, sport climbing, or multi-pitch trad climbing, or canyoneering.
Advantages of tubular belay devices:
- Versatile – can be used in about any situation with both single and double ropes
- Simple – no moving parts so it’s lightweight and durable
- It doesn’t twist your rope
Disadvantages of tubular belay devices:
- Doesn’t function as an assisted braking device in most circumstances
Assisted-Braking Belay Devices
An assisted-braking device has a mechanism that clamps or squeezes the rope when it is under tension. The assist feature requires minimal use of hand strength, but these types of belay devices still require two hands—they aren’t hands-free!
Assisted-braking belay devices (or self-locking, auto-blocking, self-braking, auto-locking, or ABDs) are designed to clamp tight on the rope with a simple camming mechanism if the rope is pulled through the device with enough force. When the device clamps down, the climber’s progress is stopped, preventing him or her from falling. They typically have a mechanism to release the rope once it’s been cinched tight.
Because of the extra features, these devices are typically heavier and cost a bit more. You also can’t usually run two ropes through these devices.
When to use: Assisted braking delay devices are most appropriate for use in gym climbing, sport climbing, or multi-pitch trad climbing – just like tubular devices
Advantages of assisted-braking devices:
- Help the belayer to stop the climber’s fall
- Feed rope smoothly
- Assisted-braking devices with camming mechanisms make it easy to lower the climber in a controlled manner
Disadvantages of assisted-braking devices:
- Not compatible with all diameters of rope. Check your specs before you buy
- Often heavier than other devices
- Some only permit rappelling on a single strand
- Can lock under large loads limiting them in certain situations
- They tend to twist your rope
- They don’t work well with wet or icy ropes
Which One Is Right For Me?
There isn’t a set answer to this question. I own both types of devices and use them differently. I would recommend that someone just learning to belay use the tubular device first and only after mastering the basics with that, switching to an ABD. This ensures you understand the mechanics of belaying and develop good habits of always keeping your brake hand on the rope.
No matter which one you choose, both require that you always use proper belay technique and have your brake hand on the rope and ready to lock off. Also, no matter what you read online or see in practice, always follow the manufacturer’s instructions for whatever device you own.
Also be sure that whatever belay device you get is compatible with the rope you will be climbing with. Not all belay devices are compatible with all ropes. Some narrow or wide diameter ropes won’t work in all devices.
Belay Gloves
Belay gloves definitely aren’t a requirement, but I’ve come to love mine and don’t like belaying without them. They’ll protect your hands from getting rope burn and give you a better grip on the rope.
They also keep your hands clean when your rope is dirty.
Any gloves will do, but I find these dedicated ones with a hole to clip them to a carabiner are the best.
-
 Petzl Belay Gloves
 -
 Belay Glasses$29.90
Belay Glasses
A long day looking up at your climber can leave you with a kinked neck. Some clever climber came up with belay glasses that give you an angled view up the wall using mirrors to save you a pain in the neck.
To learn more about climbing gear needed to get started as a rock climber, read our ultimate guide to top rope climbing.
Setting Up To Belay
Rig The Belay Device
- Put on your harness. The first thing you need to do before belaying is to put your harness on. Snug up your harness and ensure you have the buckles fastened properly.
- Attach the belay device. Step two is to clip a belay device to a locking carabiner and clip the locking carabiner to your harness belay loop.
- Connect the rope. With a normal tube-style device, you’ll push a bight of rope through the top of the belay device to line up with the retainer cable. The brake side of the rope should be on your dominant hand side. Both the bight of rope and the retainer cable should be secured in the carabiner with the gate on the opposite side as the brake strand. Ensure the rope can pass freely through the device and is not overlapping itself. (If you’re using a different belay device, follow the manufacturer’s instructions to connect it to the rope. Some devices like the Grigri also have loading diagrams on them.) Most tube devices are symmetrical, but some have one side with a groove or teeth on it. This side is the high-friction side that should be used on the brake side when more friction is needed like when the climber is heavier than the belayer.
- Close and lock the carabiner. Once the rope is secured, lock the carabiner.
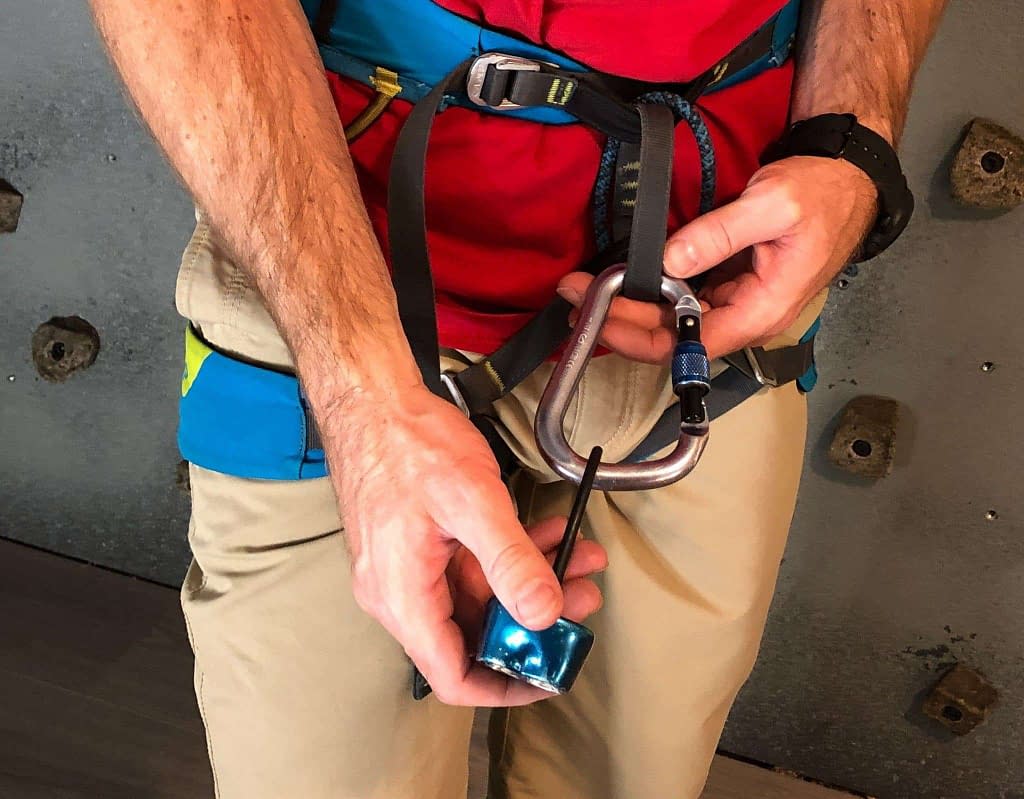
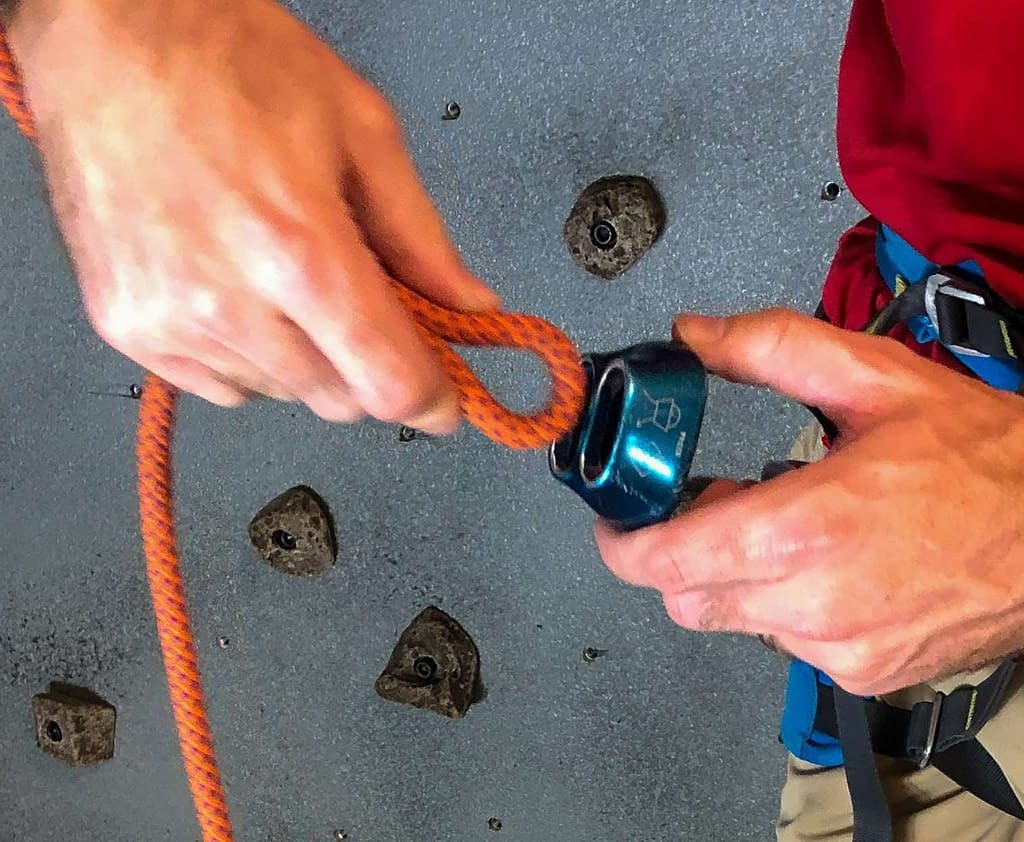
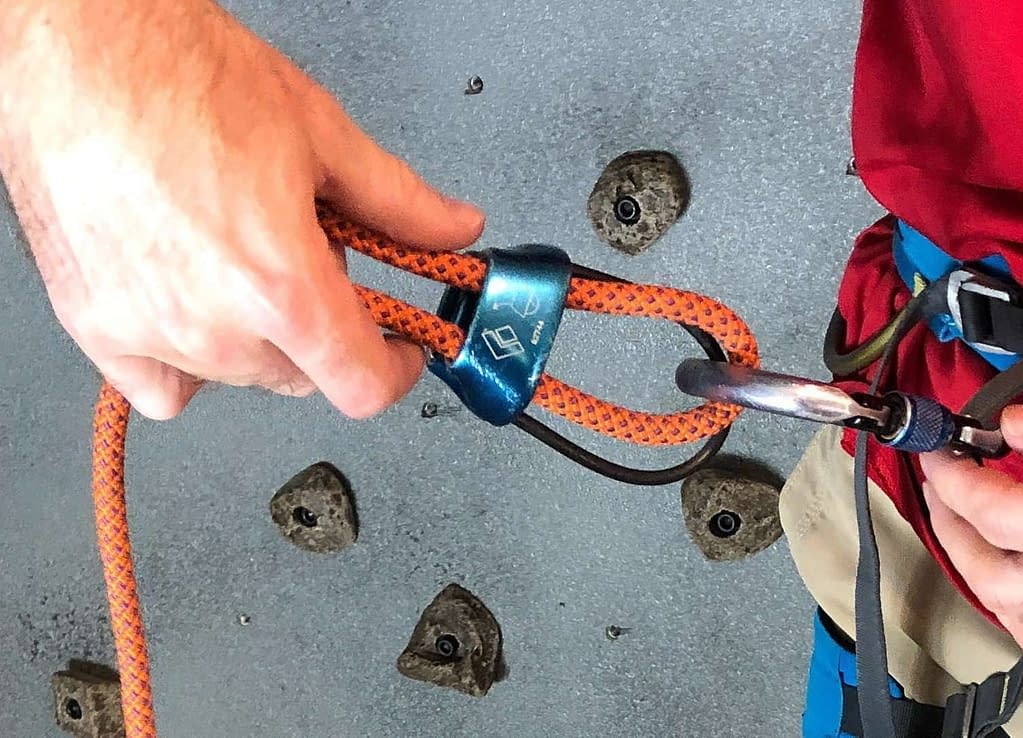
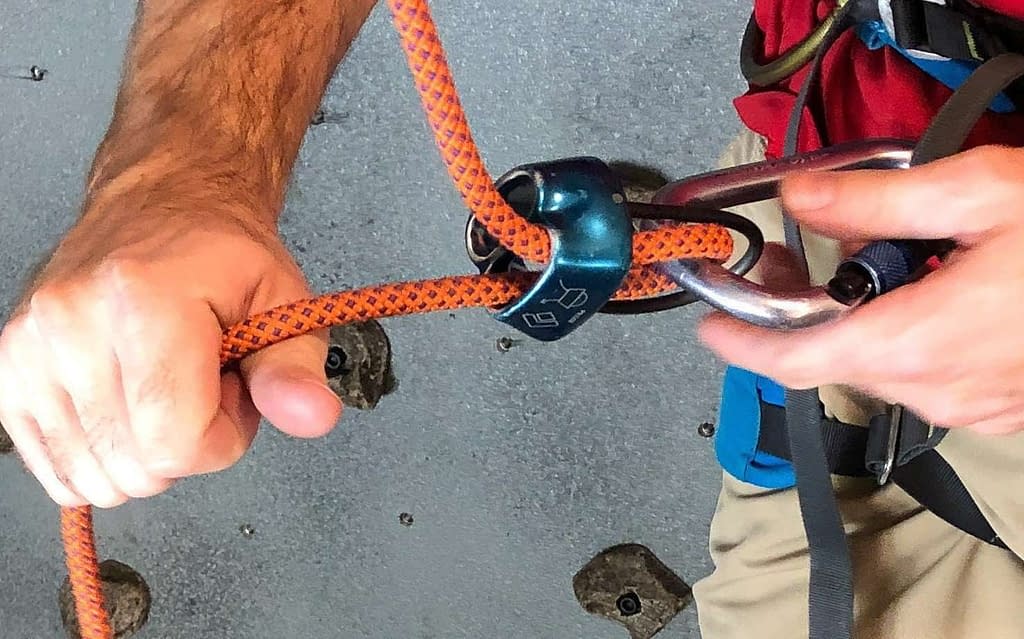
If the belayer is much lighter than the climber or if the belay stance is awkward a ground anchor should be rigged and attached to the belay or belayer.
Tie In To The Rope
Whether you’re toprope climbing or lead climbing, the climber will tie in to the sharp end (the end going up the wall) of the rope.
- Tie a figure eight. About an arm’s length up the rope, tie a figure eight.
- Run the end of the rope through both tie-in points. Run the loose end of the rope up through both tie in points until the figure eight you tied is a few inches from the harness.
- Retrace the figure eight. Using the loose end of the rope, retrace the figure eight knot.
Here’s a video on how to tie a figure eight.
Once you get the belay device and the knot set up, you’ll need to get everything else set up for the climb. The climber can put on a helmet, shoes, chalk, protection, anchor gear, and anything else needed for the climb while the belayer secures the loose end of the brake strand with a stopper knot, organizes the rope, and puts on a helmet and belay gloves.
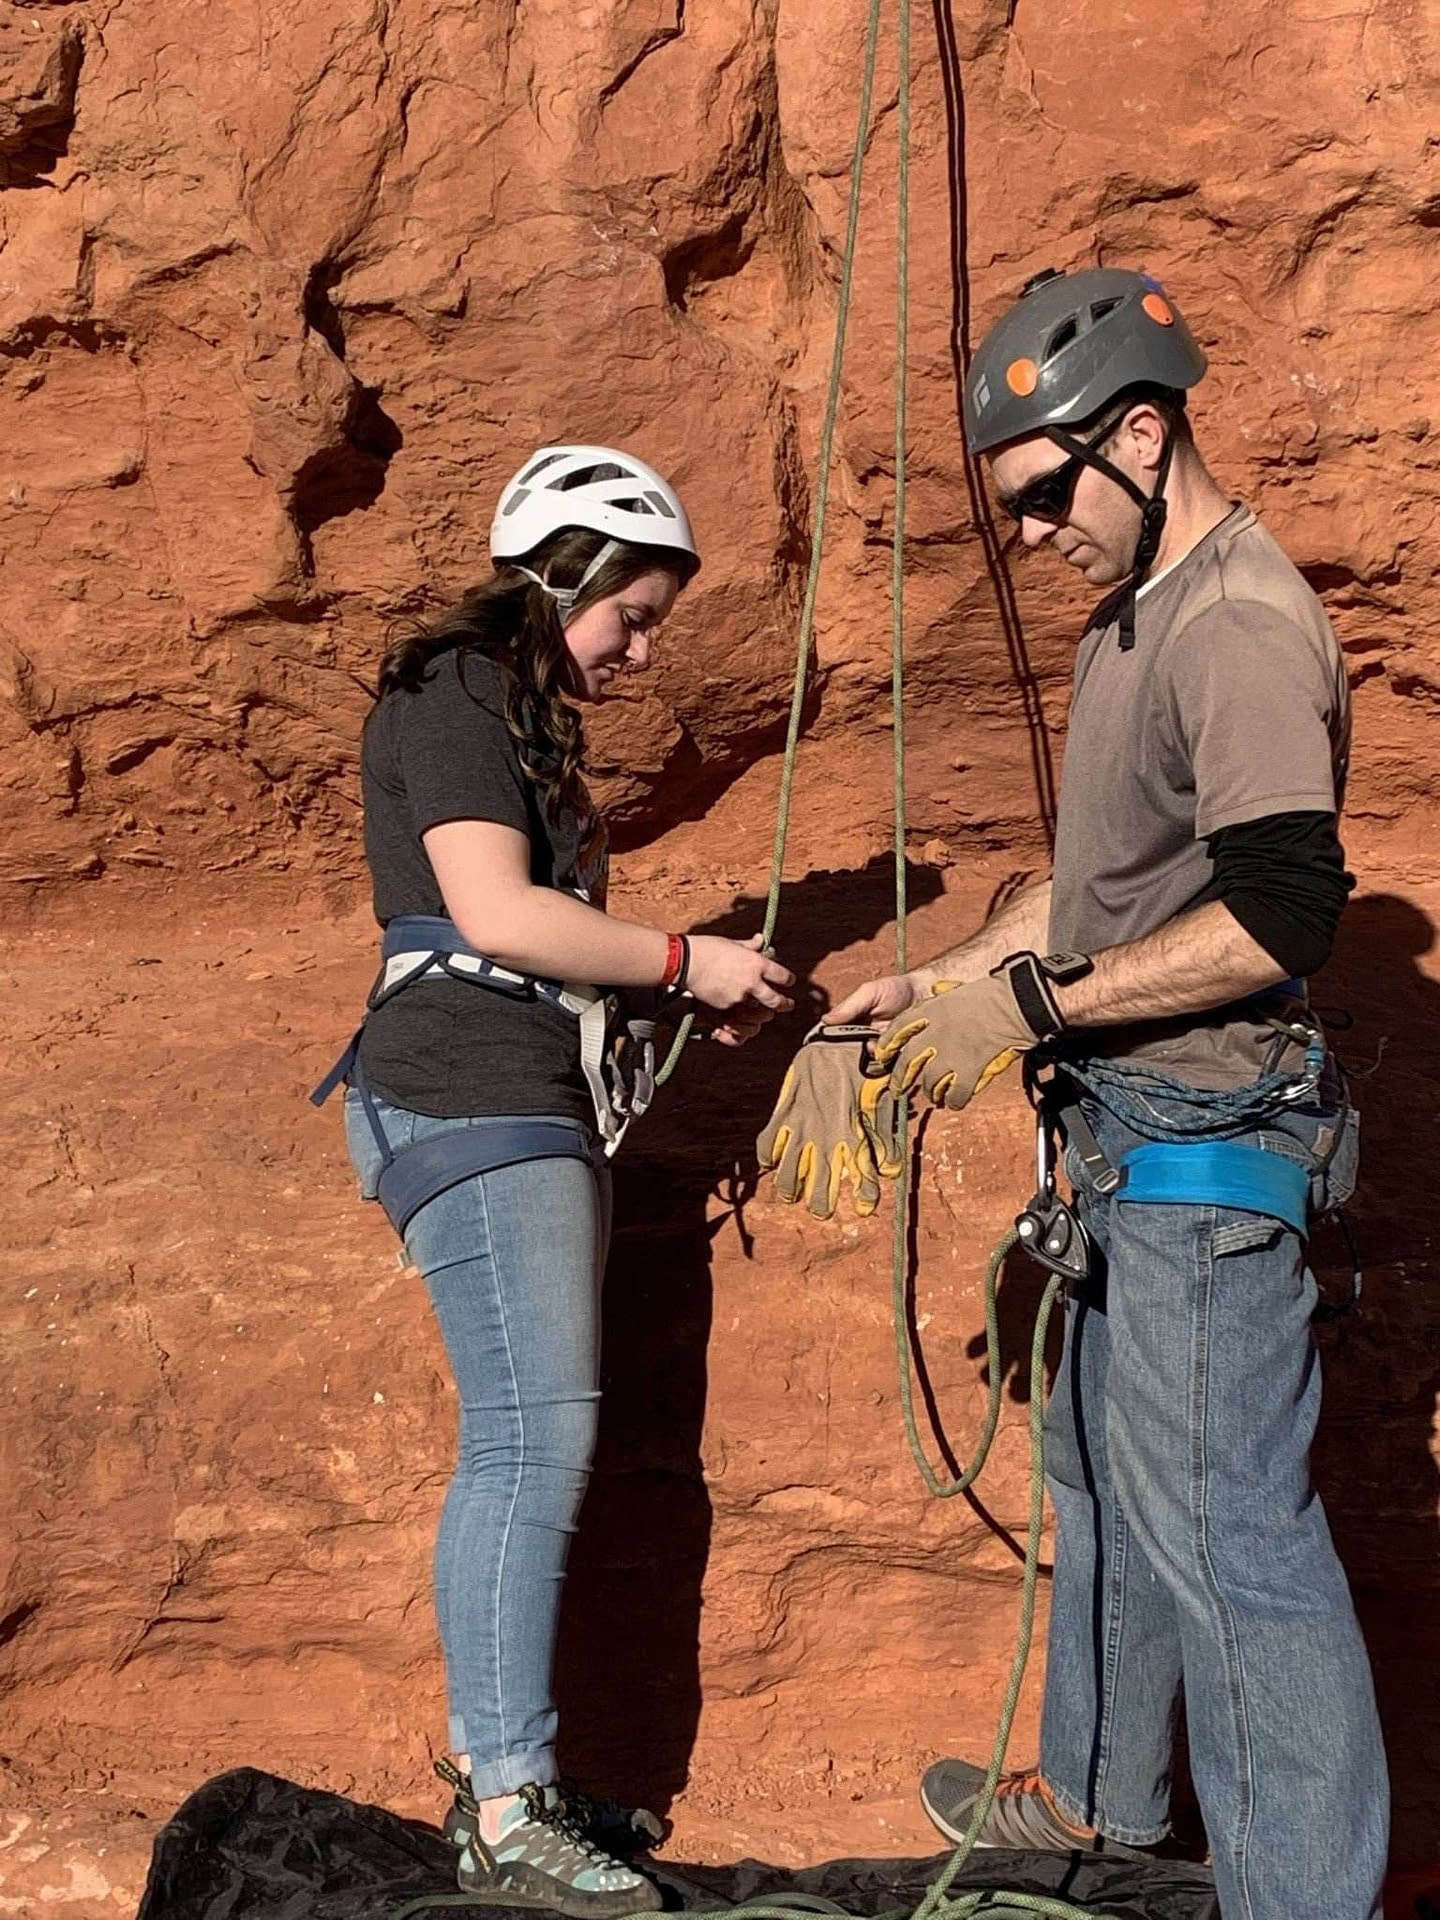
Read why I always wear a helmet rock climbing whether I’m the climber or belayer.
Check The System
After everyone is ready to climb, you need to do a safety check. The check I like to use is the C.H.E.C.K system. I like to check my partner’s equipment while I let him or her check mine. This ensures you get two sets of eyes on each part of the system.
- C – Connections: Check all connections in the system. This means to ensure all carabiner gates are locked and each connection to the harness or belay device is rigged correctly. Check that carabiners aren’t cross-loaded. I also check that I have all the gear I need to make connections as I climb up the wall and build an anchor at the top.
- H – Helmet, Harness, Hands: Check that your helmets are fastened and tightened appropriately. Check that your harnesses are fastened properly and tightly. Check that the belayer has gloves on if needed.
- E – Environment: Check that you have what you need for the climbing weather. Do you have a jacket if it’s cool? Sunscreen on if it’s sunny? Is it noisy where you’re at? Does the belayer have a good stance? Blinding light, wind, pending storms or sunset are just a few factors to consider before starting a route.
- C – Clothing: Check that you don’t have any loose clothing or hair that could get in your way while climbing or get pulled into the belay device while belaying.
- K – Knots: Check all y our knots to ensure they are dressed properly.
With the climbing system fully set up and all the safety checks completed, it’s time to start climbing, but before leaving the ground, you need to be sure you and your partner are both crystal clear on communication commands.
Communication While Belaying
If there’s one thing that will turn a beautiful day at the crag into a tragic disaster, it’s poor communication between climber and belayer. If a command to be on belay is mistaken for something else, a climber could be in a world of hurt. It happens more than it should. Establishing communication expectations may seem lame or like a waste of time, but talking through commands with any new climbing partner could save someone’s (your) life.)

Here are the most common climbing commands:
Climber: “On belay?” – This is for the climber to confirm that the belayer is ready to belay.
Belayer: “Belay on.” – This is for the belayer to give confirmation that she or he is at attention and ready to belay.
Climber: “Climbing.” – This is for the climber to communicate that she or he is leaving the ground.
Belayer: “Climb on.” – Affirmation that the belayer is now belaying a climber who’s off the ground.
Climber: “Slack” – This is a request for more rope to be fed out.
Belayer: – The belayer doesn’t need to respond verbally, but should feed out some rope and watch the climber to see if more is needed.
Climber: “Up rope.” – This is a request to remove the slack from the system.
Belayer: The belayer will take slack out of the system.
Climber: “Tension.” – This request means take all slack out of the system.
Belayer: – The belayer takes all the slack out of the system and says, “Gotcha.”
Climber: “Watch Me!” – This means the climber may fall at any moment and the belayer needs to be ready for it.
Climber: “Rock!” – this means something – a rock, a carabiner, or anything at all – is falling. When you hear this, don’t look up! Look down so your head will be protected by your helmet (You always wear a helmet when you belay, right?)
Climber: “Rope!” – This is most often used at toprope crags or when rappelling when the person rigging the rope tosses the rope down. It’s a bit like rock, but climbers will know to look for a rope which is hopefully the only thing falling from above at any time.
Climber: “Clipping.” – This is used in lead climbing when the climber pulls up slack rope to clip a draw.
Belayer: – The belayer feeds out a few arm lengths of rope until he hears the climber say “Clipped”
Climber: “Falling!” – If you hear this as a belayer, brace yourself to catch a fall.
Climber: “Ready to lower.” – The climber is ready to come down off the wall.
Belayer: – Once ready, the belayer responds with, “Lowering.”
Climber: “Off belay.” – This means the climber is secured either on firm ground or by another means and no longer needs a belay.
Belayer: “Belay off.” – This is to communicate that you’re no longer belaying the climber.
Climber: “Take.” – I hear people use this command frequently, but honestly, I don’t like it and I don’t use it because I think it often sounds like slack and mixing those two up isn’t ever good and can be dangerous. I prefer to use “Tension” instead of take.

Other Communication Concerns
On some routes where visibility from the belay station to the top of the route is limited or a noisy highway or river makes verbal communication hard, having alternate methods to communicate with each other will limit your risk. Prepare for these sorts of scenarios before you leave the ground and it’s too late.
Most commonly used in these scenarios are tugs on the rope. To indicate the climber has reached the top and is ready to come off belay, three sharp tugs of the rope is the usual signal. For the belayer to communicate back to the climber that she’s off belay, three more sharp tugs are used. Confirm the command with a set of response tugs.
In situations where you can still use verbal signals, but there is other noise or climbers in the area, be sure to discuss that each signal will be confirmed by the partner while they’re on the wall. “Chris – off belay?” “Alicia – Belay off.” Be loud and clear in commands and be sure to call people names.
Calling People Names
Okay, so we maybe don’t want to call people names, but we do want to use their name when calling commands when you’re not alone at the wall. It’s easy to confuse the command of a climber on the route next door with your climber’s command if names aren’t used. It’s best practice to either start or end a command with a name. “Chris – Tension!”. The exception to this is when you’re falling or if you’re calling “Rock!”. Those signals require everyone on the ground to pay attention.
Belaying Technique
So you’ve stuck with me through all the prep. Now we can actually get to the meat of belaying. Belaying starts once you give the acknowledgment to your climber of “Belay On!”. From this point on you must follow a few key rules to keep your climbing day from ending very badly.
Belaying Physics
Let’s start with a basic overview of the forces at work while belaying. First off, the belay device is essentially a friction device. To stop a climber’s fall, you apply greater friction to the rope. to let the climber ascend with more rope, you apply less friction. Tube style belay devices generate more friction on the rope as the angle of the rope increases.
Rope Angle
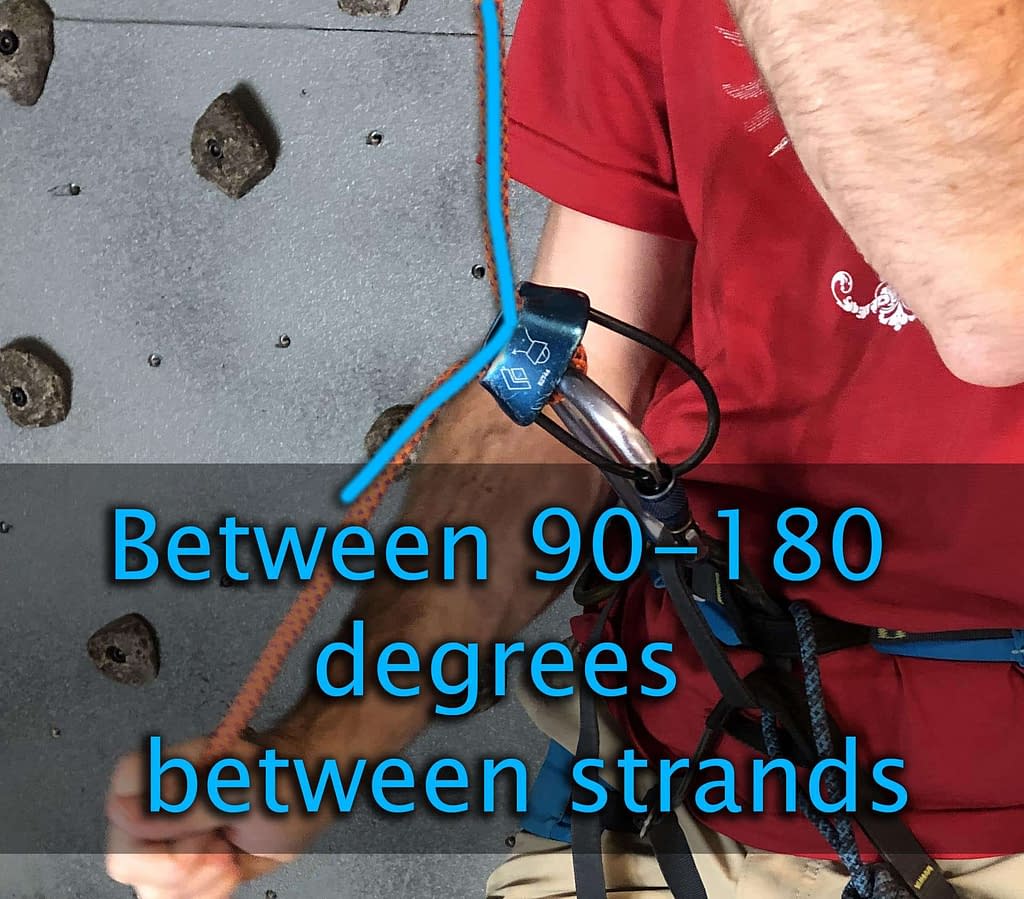
The angle of separation between the brake strand and the load strand controls the friction on the rope. At near 0 degrees (when the brake strand and load strand are next to each other), there is very little friction and the belayer has little to no control of the climber. Friction increases slightly as you approach 90 degrees, but at about 90 degrees, friction increases significantly more and the belayer will have better control of the climber.
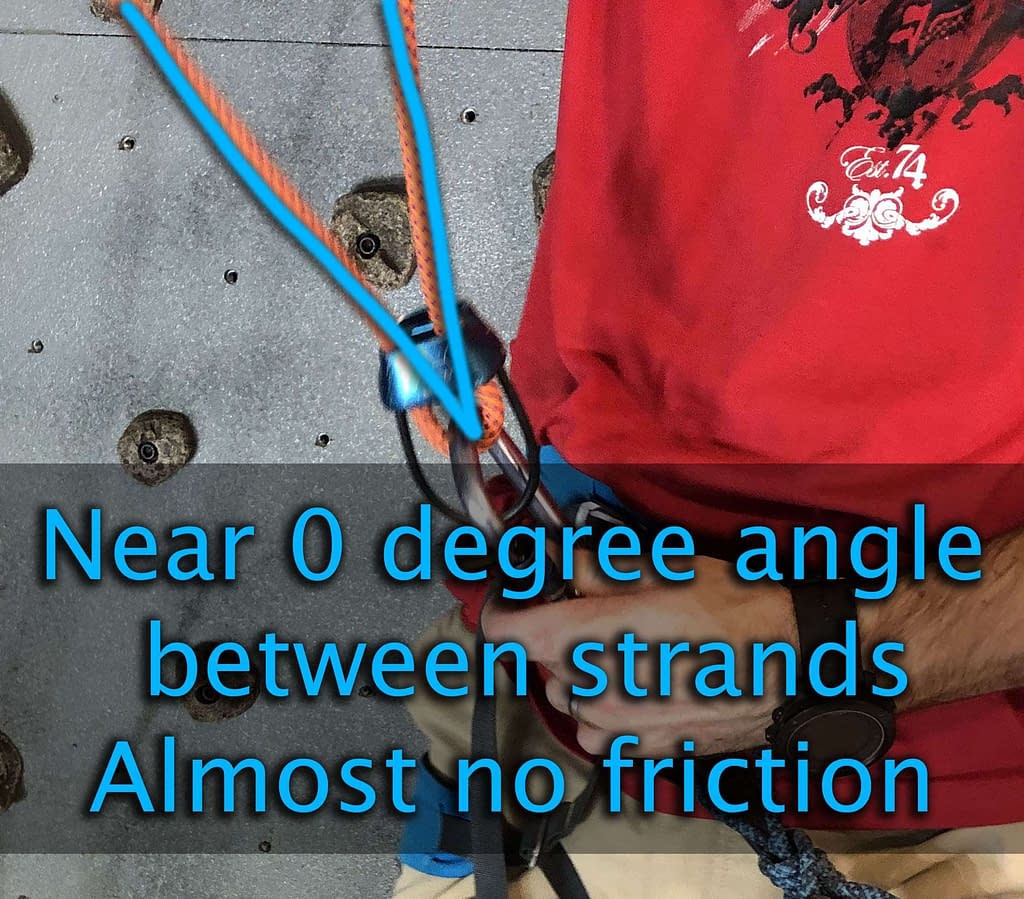
From 90 to 180 degrees the control will increase even more. This range works best for lowering, taking in, or feeding out rope.
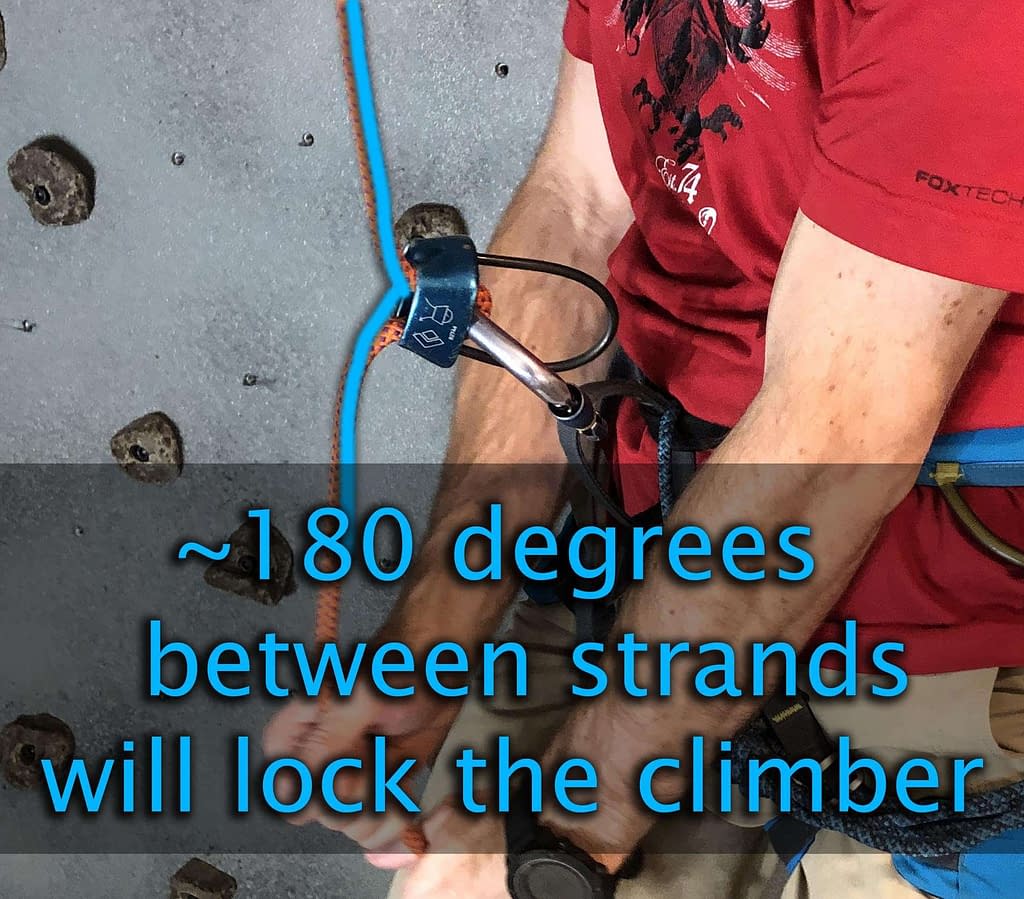
At about 180 degrees, there is enough friction, that if the belayer keeps a firm hold on the rope, the system will be locked.
Climber And Belayer Weight
Another force at work while belaying is the force generated by the weight of the climber when she falls. If the belayer is equal to or lighter than the climber, depending on the force of the fall, the belayer may be lifted off the ground. the friction on the anchor can limit this force greatly, but the belayer should be prepared to fly and should use a ground anchor if needed.
Rules of Belaying
Belaying isn’t terribly complicated, but it is a critical task in keeping you and your climbing partner safe so follow these rules at all times.
Rule 1. Never take your hand off the brake line! Ever! (At least not until you hear “Off belay.”) Your dominant hand should have firm control of the rope throughout the climb.
Rule 2. Always pay attention to your climber. While belaying, it’s not time to chat with friends, take pictures, or grab a drink. You should focus on keeping your climber safe throughout the entire climb.
Rule 3. Don’t slide your brake hand until your guide hand is firmly holding the rope.
Rule 4. Stay in the ready position. You never know when your climber could take a fall. Don’t get yanked off balance or dragged across the ground by not paying attention.
Proper Belay Stance
You may see people at the crag or the gym belaying from seated positions or even while laying on their backs. If you watch, you’ll see all kinds of bad practices. Don’t be one of these bad examples.
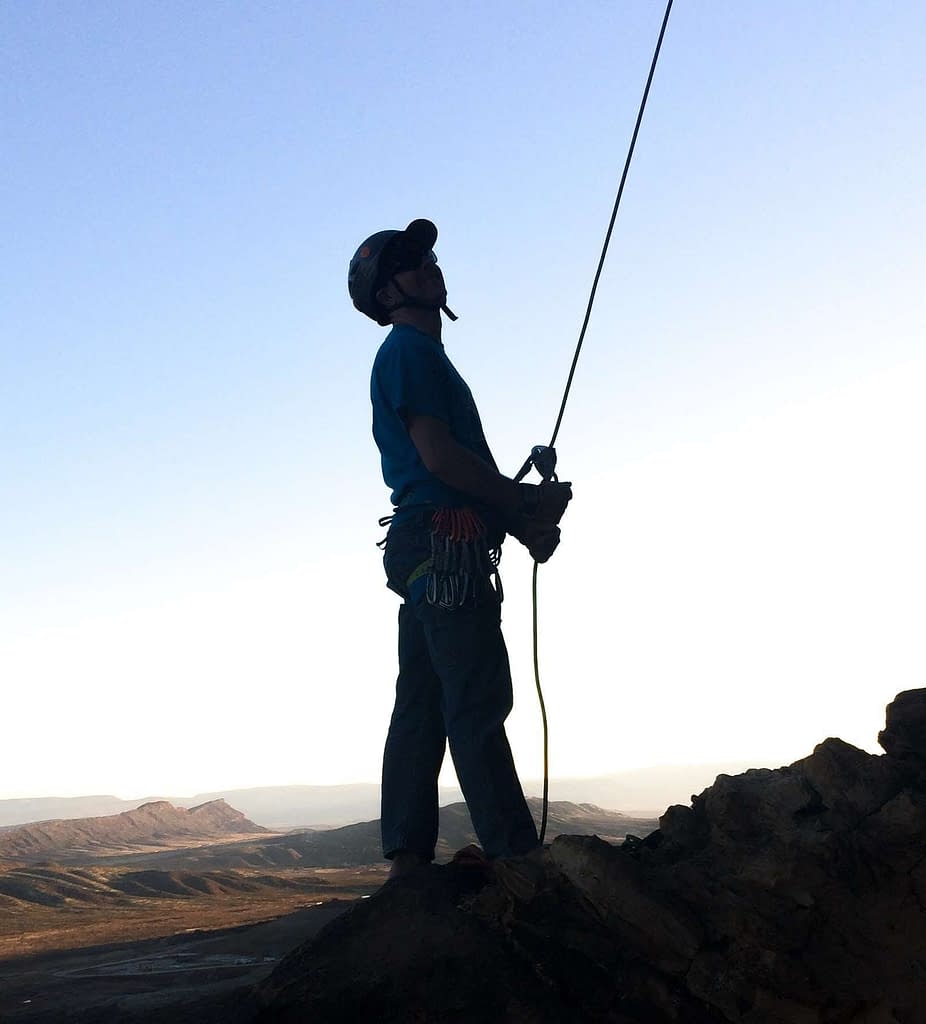
The proper stance for belaying is an athletic ready position. Your non-dominant foot should be slightly forward with your shoulders and body squarely facing the wall. You should be close to the wall but not directly underneath the climber. Move side to side to keep the rope out of the climber’s way and to avoid being right where the climber would land if they fell.
Taking In Rope While Belaying
The first and main thing you’ll do as a belayer for a top rope route is to take in slack as the climber ascends. Most climbers are teaching a simple technique to do this called the PBUS method.
PBUS Method

The PBUS method of belaying is easy to learn and easy to remember but requires a bit of practice to master. Let me break it down step by step.
P – Pull
Pull down on the climber’s rope with your guide hand – your non-dominant hand and the one on the opposite side as the brake. At the same time, pull out with the brake hand to get the slack through the belay device.
B – Brake
Put the brake strand down in front of you in the brake position. This bend puts friction on the rope at the belay device that will hold the rope tight.
U – Under
Move your guide hand to the brake strand under your brake hand and firmly grasp the rope.
S – Slide
With your guide hand now firmly on the brake strand, slide your brake hand up the brake strand without removing it from the rope. Slide until it’s a few inches from the belay device. Now move your guide hand back to the climber’s strand for another pull.
Repeat as needed to keep slack out of the system.
Tips
Here are a few tips to make belaying easier for you.
- Little movements are easier to manage than big ones. Unless you’re an orangutan with gigantic arms, trying to pull too much slack at once doesn’t work well. Just pull a foot or two at a time.
- When the climber first starts off the ground or when she’s exposed to a dangerous fall, keep the belay tight to keep rope stretch low. Do this by sitting into the belay and choking up as tight as you can on the rope.
- Always keep your hand in the natural grip position with the thumb up toward the belay device.
- Use an experienced backup belayer who can hold the brake strand while you’re learning how to belay.
- Always keep an eye on your climber. Anticipate her movements and be ready if she falls.
- If the climber falls or needs to rest, you can hold the rope in the brake position with both hands to make it more comfortable. You can also sit into the rope to hold tension on the climber and keep her from sliding down as the rope stretches.
Other Considerations
In top rope climbing, you’ll also need to be mindful of the rope running up behind the climber. Try to keep the rope out of their way by moving from side to side. Also, be aware of how tight you’re keeping the rope. Many beginners like the rope to be as tight as possible, while more experienced climbers will prefer to have a bit of slack so their movements aren’t influenced by the rope.
Catching a Falling Climber
It’s inevitable that at some point a climber you’re belaying will fall. Whether they call it out first with an audible “Falling!” or not, you need to be ready to catch them with the belay. This is where you’re attention and good positioning will pay off. To catch a falling climber is straightforward, but can be painful if not done correctly.
The first instinctual reaction you should have is to lock the rope into the brake position straight down. With the rope locked, the next decision you must make is how to best absorb the fall. This will vary depending on your weight, the climber’s weight, the distance of the fall, the amount of rope between you and the climber, and the terrain you’re belaying from.
There isn’t a set answer, but generally, you want to give the climber a soft catch. This means the rope and you absorb much of the impact of the fall. To do this you want to move in the direction the rope pulls you. This could be a slight move as you raise your hips up from the ready position or a large move as you get pulled off the ground and into the wall.
Either way, you need to be ready and anticipate what a fall will look like and be prepared to respond. When belaying a top rope climber, the impact on the system will be minimal if the slack is kept out of the system. In these cases, all you’ll likely need to do is lock the rope and step into the fall a bit. When I’m belaying my kids I usually only have to brake them and let the rope absorb the fall.
Rope Stretch
Note that climbing ropes are dynamic and stretch quite a bit when loaded. This is to help absorb a fall. the more rope you have out, the more the rope will stretch. This is important to consider, especially when a climber is just off the ground and the rope is let out almost double the length of the climb.
If the climber were to fall at this point, the rope could stretch many feet and the climber could either hit you as a belayer or hit the ground if they’re not high up.
To mitigate this risk, I like to sit deep into the belay at the beginning to stretch out the rope. I only do this on top rope climbs, but it can give reassurance to new climbers that they’re securely held by the rope.

Rope stretch isn’t a comforting feeling to most beginning rock climbers.
Lowering A Climber
When the climber reaches the top of a route or is ready to come down, you’ll need to lower them down safely.
When the climber calls for “Tension”, pull in all the slack and lock off the rope. The climber will get in the proper position to be lowered and say “Ready to lower.” which indicates you can start letting rope through the belay device to bring the climber back down.
The best way to lower a climber is to place both hands on the brake strand of the rope and let the rope smoothly slide through your hands. Maintain complete control of the rope throughout the entire lower.
You may need to stop the climber or slow them down so they can navigate ledges or outcrops on the wall. Don’t drop them too fast!
When the climber gets to the ground, slowly bring them down until they’re on the ground and you hear “Off belay.” When you finish belaying, repeat back “Belay off.”

Conclusion
I hope this article has helped you learn the fundamentals of belaying a rock climber. The next step is to get out there and practice. You can read all you want, but you won’t be a confident belayer until you get some real practice time in. Go to the gym or set up a belay at the local playground with a climbing wall. Practice the PBUS motion, and practice braking and catching a fall in a low-risk setting before you take someone’s life in your hands.
If you want to learn more about the basic skills and gear needed for rock climbing, be sure to read my ultimate guide to top rope rock climbing or our general rock climbing page.
If you’ve got additional thoughts on belaying or have questions, feel free to drop them in the comments below.


